Chocolate Chip and Banana Loaf

Chocolate Chip and Banana Loaf


For today's post we're coming back with a chocolate chip and banana loaf. In our house we have always made banana and walnut loaf and the recipe originally belonged to my Nan, which then was passed on to my Momma who used to cook this with us when we were little. 

So battered but much loved!

I never enjoyed walnuts in anything so I never really used to eat the loaf or I would nibble round them, so this time round I decided to remove them all together and stick with a complete favourite of mine in a choc chip and banana loaf! The recipe is quite simple to make, and all you have to do to the banana is mash it, the riper the better! The recipe is in ounces but it is quite easy to convert if you want to use grams instead.


Hope you enjoy!

Ingredients:
-4oz soft dairy free margarine-
-40z soft brown sugar-
-1 large ripe mashed banana-
-2 eggs-
-1 tbsp golden syrup-
-8oz self raising flour-
-1 level tsp mixed spice-
-1 packet of dark chocolate chips-

Method:
1) Preheat the oven to 180 degrees. Grease and line a normal sized loaf tin or 2 small ones.
2) In a large bowl cream the butter and sugar together until light and fluffy.


3) In a small bowl mash the banana, then add the 2 eggs and golden syrup, mix, then add to the butter and sugar and mix until combined and not separated.

(aware that at this point the mix looks like sick, do not panic hang in there!)

4) Mix together in a small bowl the flour and mixed spice and sieve into the wet mix, folding the mixture until just combined.


5) Add in your chocolate chips and fold until evenly distributed.


6) Spoon your mixture into the tin, being careful not to fold your lining over which will make dents in the cake and pop in the oven for 40 minutes, then reduce the temp to 160 and cook for a further 20 minutes.


7) When the cake is cooked (when a knife runs clean of wet batter) leave in the tin for 10 minutes then empty out onto a wire cooling rack until cool.
8) When cool, you can leave the cake as it is and slice it or you can drizzle a thick water/icing sugar icing over the top for decoration.


We hope you enjoy this cake as much as we have enjoyed eating it!

Happy Baking!

xoxox

Easy 15 Minute Salmon Pasta

Easy 15 Minute Salmon Pasta

Tonight's dinner was this beautiful 10 minute healthy as creation. We had salmon to use up so I came up with this filling salmon pasta. You can add whatever veg you fancy to the dish, we used a veggy pack from Sainsbury's which had brocolli, sugar snap beans and asparagus. We also added feta (just check that it doesn't have cows milk in) as I like the sharpness that feta gives and the calcium too as I am really worried about where I can get some from. On my pasta I added some Tabasco as I love the combo of that and the beans! This really was the simplest pasta dish and was so delicious too! Enjoy! This made 2 portions.


Ingredients:

-2 salmon fillets, ours were microwaveable-
-pasta enough for 2 portions-
-any veg you fancy-
-40g feta cheese-
-half a tub of pasata-
-optional Tabasco-

Method:
1) Pop your pasta on to boil.
2) when the pasta starts to soften, boil your veg and microwave your salmon (or to manufacturers instructions) for about 4 minutes for both.
3) drain your pasta and veg when soft and cooked.
4) place inside the same saucepan and pour in your pasata. Bring to the boil.
5) when the salmon is cooked plate up or mix into the pasta, and then pop your pasta on the plate.

This is stupidly filling and delicious and was made in about 10-15 minutes depending on your pasta and how long it takes to boil! Sprinkle some Tabasco on if you're feeling the heat!

Enjoy!

Happy cooking!

xoxox


Dairy Free Nutella Cupcakes

Dairy Free Nutella Cupcakes

Wow it feels good to be back. I have finished my work placement and Caitlin has finished school for this year so we are mostly refreshed, recuperated and all systems go back on the blog. We can't promise content every day or week but what we can hopefully promise is to not leave everyone in the lurch like that again, sorry! So with that, our hiatus is over and we bring you our chocolate dairy free Nutella style cupcakes. These cupcakes are for the die hard lovers of all things cupcakes and Nutella rolled into one delicious mouthful. This recipe uses Nature Store Free From Hazelnut and Cocoa Spread which is beyond all levels of tasty and is most definitely on par with normal Nutella. We normally find this at our local big Sainsbury's and the recipe makes 12 gawjus cupcakes, enjoy!


Recipe:

For the cupcakes:

-100g dairy free margarine-
-100g caster sugar-
-2 eggs-
-75g self raising flour-
-25g cocoa powder-

For the icing:
-125g dairy free margarine-
-225g icing sugar-
-2 tablespoons of hazelnut and cocoa spread-
-1 tablespoon of cocoa-


Method to the madness:

1) Measure out all of your ingredients. Preheat that oven to 180°C and pop some cupcake cases in a cupcake pan.

2) Cream together the margarine and sugar in a big bowl until pale, fluffy and smooth.

3) Slowly beat in your eggs until the mixture is smooth and creamy.

4) Sieve in your cocoa powder and flour until all combined and a smooth cake batter is formed.

5) Evenly dollop batter into the cupcake cases until about 2/3rd full and put in the oven for around 15 minutes until cooked through and springy to the touch. Place on a wire tray to cool.


6) To make the icing whip up the sugar and butter slowly until well combined and fluffy. Then add your hazelnut and cocoa spread into the icing and again whip up until light and fluffy. Add optional cocoa powder to your own taste or desired colour.

7) Pipe or spread onto your cupcakes and then voila! You have your beautiful just as damn good as Nutella cupcakes.

Hope this recipe has been just as useful and delicious for you as it was for us!


Happy Baking!

xoxox

A little update

A little update

 
(can we just take a minute for Season 5 Ep 8 of GOT? ERRRMAAAAHHHHHGHHHHH)
 
So I know we haven't posted in a while so just thought we'd give a little life update and try and prove we aren't blanking anyone, promise! 
 
Life is crazy at the moment, I'm coming to the end of placement (and still not in the same place for more than a couple of days at a time) and Caitlin is at the back end of her first year of GCSE's! Hopefully normal service will resume when I am living at home full time over the summer and me and Caitlin have all the free time in the world!
 
I am also aware that the tweeting and instagramming has been all quiet on the western front too and this will get back to normal when I get some sleeeeeeeep zzzzz
 
Now for less moaning about woe betide us...
 
I am thinking about attending the FreeFrom and Allergy fair in London on the 3-5th July, has anyone been and could recommend whether to go or not? I feel like it would be a great opportunity to explore different brands and methods of dealing with being dairy free!
 
I hope everyone who reads this is having the most gorgeous day and we hope to be posting normally soon (6 weeks latest!)
 
Lots of Love
 
 
Hev and Cakes


Hotel Chocolat Milk- Free Milk Chocolate

Hotel Chocolat Milk- Free Milk Chocolate

*disclamer, this chocolate has had a product recall due to the risk of milk, you can return the chocolate to hotel chocolate if needed if you are allergic or not happy with the chocolate!

Easter is fast approaching (this weekend!) and I am eager to suss out more dairy free chocolate options to try and stop me dicing with destiny and just indulging in a Crème Egg Easter egg! I had heard from other dairy free blogs that Hotel Chocolat had launched a range of milk- free milk chocolate, I was more than intrigued. I was at home last weekend, and as there is a Hotel Chocolat there I just thought, why not? I picked up 2 edible 'bunny licks' (very cute and Easter themed) one for me and one for our brother Joey. I also picked up a packet of 'puddles', which are basically just giant buttons!
I was slightly taken aback by the price, I knew the chocolate would be costly (coming from a specialist shop) but I suppose you are paying for the chocolate specialism and the awkwardness of making it dairy free! Each bunny cost £1.95 each, and the packet of puddles cost £5.50. Being the sucker I am for something that might revolutionise my chocolate life I forked out.
The chocolates are made with almond powder instead of milk powder, which I think is a different approach to chocolate than I have seen before, yet excludes nut allergy sufferers from the range. However, the range is completely vegan and vegetarian, which is something to consider! The chocolate also uses sunflower lecithin instead of soya lecithin which may benefit some with allergies.

Chocolate Bunny:

bunny lick

Ingredients:
Cocoa solids (cocoa mass, cocoa butter), sugar, almond powder, emulsifier (sunflower lecithin). 

Chocolate puddles:

Chocolate Puddles

Ingredients:
Cocoa solids (cocoa mass, cocoa butter), sugar, almond powder, emulsifier (sunflower lecithin).
Chocolate Puddles

My thoughts:

As it is before Easter and Joey is getting his on Sunday I can't give you his thoughts, even though knowing him chocolate is chocolate and he won't notice anything different!
The first thing that hit me about these chocolates was that they definitely had a creamy feel in the mouth and tasted immediately like normal chocolate, if not a weaker version. After this had subsided there was a definite fruity undertone to the chocolate, which I would liken to raisins. I liked the fact that they looked completely like normal chocolates as well, unlike some I've had before. Aftera few puddles they definitely start to become a little sickly, which is something I never normally have issues ploughing through! Overall I quite liked these choccies. For me, this is one of the closest chocolates to normal chocolate I have found. I wouldn't mind eating this occasionally as an extravagant (probably payday) treat! The price point does put me off, as I am a student, but I would buy this as a gift for others.
Available within the range was 2 different types of Easter eggs and some mini chocolate bunnies in a pack.
I hope you have found this useful and if you feel a little treat is needed then this is a great range of chocolate!
Happy Baking!
xoxox

Spicy Chicken and Chorizo Stew

Spicy Chicken and Chorizo Stew

It's felt like years since we last blogged, even though it has only been little over a week! Life gets in the way sometimes, and quite a lot of the time it's pretty difficult to plan things to cook for the blog as I'm in Sheffield at Uni and Caitlin's at home. I feel like we are getting into the rhythm of blogging, not sounding too blunt and being a bit softer. Neither of us are that impressive with English (unlike our English obsessed sister) so it's still definitely a getting there process for us. I never want blogging for me or Caitlin to feel pressurised or not fun anymore. It's a hobby we can do together and I love that, considering we're apart for weeks at a time. So I'll stop boring you all with our lives and it's onto the recipe!
 
Whilst I was sat at work, I couldn't stop thinking about beans and chorizo. Considering one of my passionate food hells is baked beans I thought this was a bit coco bananas! But it got to the point where it was nigh on obsessive, and as I was due to go food shopping anyway I thought why the heck not buy some stuff and mash it together and see what happens! So what was created was the chicken and chorizo stew. I'm not really sure why it is called a stew, but to be honest I couldn't think of a more suitable name for this! It's based on tomato and has a heck lot of garlic and chilli in for flavour and a nice warm kick up the bum! I used a small tin of cannelloni beans for this, alongside some chorizo sausage and turkey (I used turkey as it was cheaper in the shops but can be made with either chicken or turkey!). It really filled me up and I missed the feeling of being full up but in a healthier way, and not just from KFC (which may or may not have been happening far too often recently). The tomato makes for a delicious base to the dish and everything else compliments beautiful, and would even taste delicious with added bacon or no chilli if you wished! Quite a lot of the amounts here are rough estimates, just splash however much you want in of everything to your own tastes! We hope you all enjoy!

Spicy Chicken and Chorizo Stew

Ingredients:
-splash of oil for the pan-
-500g chicken or turkey, diced-
-2 small chorizo sausages-
-50g onion-
-1 small tin of cannelloni beans-
-1 large tin of tomatoes-
-1 small tin of sweetcorn-
-30g tomato puree-
-30g crushed chilli-
-30g garlic puree-

Method to the madness:

1) Pop oil into pan, and add the diced meat, chorizo sausage and onions. Cook for 3-4 minutes until the meat is cooked through.

2) Add in the beans, sweetcorn and tomato, stir through.


3) Add in your garlic, tomato puree and chilli, stir again and simmer down for around 10 minutes.
 
Look at that beautiful uni hall stove, so pretty...

4) When reduced down, meat cooked and the flavour is what you require, take off the heat, pop in your bowl and tuck in!
 

So in under 20 minutes you should be left with a super simple, quick and hearty meal, enough to feed 2-3 people depending on sides! As you can see I enjoyed mine with a cider and I regret nothing!
 

We hope you enjoy!
 
Happy Baking!
 
xoxox

Minute Molten Mug Brownie

Minute Molten Mug Brownie

Hi everyone! As you may have seen we have had a slight blog redesign, with a new banner which should make us easier to find on twitter and instagram! Please let us know what you think of these, we're slowly learning all about blog coding and layouts so please bear with us whilst we figure out how to make the blog look and feel the best it can be! However, now is the thing you've been waiting for- the recipe!
Coming of the back of our delicious minute mug cookie recipe, we are bringing you all yet another super delicious, minute long recipe for the impatient chocoholics out there! The recipe can be made in any microwavable mug, perfect for curling up on the sofa and eating whilst watching some Sunday night TV! Once again this recipe is only measured out in tablespoons, so can be measured at home or in the office (if you're feeling particularly naughty!). This recipe is incredibly moist and gooey, and if you prefer a harder brownie you can keep it in the microwave for slightly longer! The chocolate chips in this recipe can be swapped for a dairy free Nutella style spread, we normally use Natures Store chocolate hazelnut spread which we find tastes exactly the same as normal Nutella! We hope you enjoy!


You will need:

- 2 tbsp water-
- 2 tbsp dairy free butter/ margarine-
- 4 tbsp caster sugar-
- 2 tbsp cocoa-
- 4 tbsp plain flour-
- 1 tbsp dairy free chocolate chips (or dairy free nutella like spread if you fancy it!)


1) Melt the butter in the microwave at short 20 second bursts until fully melted.


2) Mix all the ingredients into the butter well so that the mixture is smooth and has no lumps.


3) Pop your brownie mixture into the microwave for 40-70 seconds depending on how squidgy you like your brownie!

4) Leave to cool for 1-2 minutes until just warm and serve!

We hope you enjoy another super quick and simple mug cake recipe as much as we enjoyed eating it!

Happy Baking!

xoxox

44 Home Truths Dairy Intolerant People Know!

44 Home Truths Dairy Intolerant People Know!

The big thing on both our facebook feeds at the moment is the trend for these little lists, so we thought we'd do one about the eternal life struggle of living your life without dairy. Coming off dairy when you have no other choice is one of them things- if you don't laugh about it then you'll just cry. So here we have 44 of the struggles of not eating dairy...


  1. Never being able to eat a Dominos again. Unless you eat pizza without cheese, then you're just fucking weird.
  2. Being an awkward person and having about 2 restaurants you can eat at safe in the knowledge of low risk of diarrhea.
  3. Being unable to leave the house without a full pack of diarrhea tablets.
  4. Seeing a free from pizza in the supermarket, internally crying with excitement until you realise its only gluten free.
  5. Everything you want to eat is only gluten free.
  6. All free from foods creating a crater sized dent in your purse.
  7. Seeing pizzas with goats cheese or buffalo mozzarella and then realising they are covered with normal cow mozzarella too.
  8. Never buying a shop bought pizza again.
  9. Thinking a product is safe until you see the dreaded 'whey powder' on the back.
  10. Never being able to make protein gains again without rupturing your anus.
  11. Risking 'may contain milk' cos you just can't cope any longer.
  12. People taking you out for food and then watching them be terrified they've accidentally poisoned you.
  13. Screaming FUCK MY LIFE when Cadbury Creme Eggs come out to play and you can't play :(.
  14. Wondering why you have been given this no dairy gift and are still not losing any weight.
  15. The spots you hoped would leave your face are still there. So it wasn't dairy then was it, just your goddamn hormones :(.
  16. Your farts becoming so toxic at the mere hint of dairy they could be used during chemical warfare.
  17. Threatening everyone with said farts.
  18. Worrying far too much about where you're gonna get your calcium, I don't want no bones dammit.
  19. Being ribbed the shit out of for your malfunctioning bumhole.
  20. Being unable to spell 'diarrhea' even though you get it minimum once a week.
  21. Judging whether or not to throw up or shit yourself first, or just risk it and do both at the same time.
  22. Giving in to one 'low risk' dark chocolate and regretting your decision for the next week.
  23. Having to ask for no cheese at Subway and only being able to have it toasted :'(.
  24. Alternative milks. Drinking milky water or the taste of a farm no thank you.
  25. Never being able to try Baileys.
  26. Never being able to try a choco milko (the tears are real).
  27. Bleaching your toilet more frequently than other normal humans.
  28. Not feeling like a normal human at all.
  29. Trying to convince other people they're dairy intolerant so you don't feel so alone.
  30. Having intense dairy envy when watching anyone look at/taste/smell dairy.
  31. Calling in sick because you're lying on the bathroom floor crying about your life cos someones snuck some dairy in without your knowledge.
  32. Taking calculated risks every time you eat.
  33. Realising you're only one step away from being a vegan (bacon stay with me!).
  34. Having the choice of 1 sandwich on the go.
  35. Watching out for crisps hiding milk in there (yes Pringles I'm talking to you you fuckers).
  36. Having to get your friends to strip cheese off their cheesy chips on a night out so you can eat them, yet still get ill the next morning.
  37. You KNOW the difference between hangover poos and dairy poos.
  38. Only being able to get ice cream from Waitrose.
  39. Having to visit health food/ vegan shops way more than you would ever have intended before.
  40. Never eating dessert again.
  41. Having to watch WINE of all things trying to kill you cos its strained through a cow (Why? How? The need?).
  42. People not understanding the difference between lactose and dairy intolerant.
  43. Feeling like your heart has been ripped out cos you miss cheese, milk and butter so, so badly :'(
  44. Realising you're gonna have to live like this for the rest of your life.
The struggle is real folks.

xoxox


Momma's Special Chocolate Birthday Cake

Momma's Special Chocolate Birthday Cake

Here we are again with a brand new recipe! We can't believe we are almost at the end of February already; where is the time going? However, the end of February means that it is time for our mom's birthday! To celebrate this Caitlin has made the most awesome dairy free cake we have ever tasted, a delicious chocolate fudge cake!


Birthday chocolate fudge cake

The sponge here is incredibly moist, and is enclosed in a deliciously thick and super rich icing which is so fudgy the smallest slice is needed for maximum impact! There are no pictorial instructions for this cake as we were too excited to get this in the oven and bake it before we remembered, so the post is just littered with scrumptious photos of the finished cake instead! This one is for you momma, happy birthday xxx

Ingredients:

For the cake:
-200g dark chocolate-
-200g dairy free butter-
-4 eggs-
-1 tsp  vanilla extract- 
-325g caster sugar-
-175g self raising flour-
-1 tsp baking powder-
45g cocoa powder-

For the icing and filling:

-300g icing sugar-
-150g dark chocolate-
-150g dairy free butter-
-15g cocoa powder-
-1 tsp vanilla extract-

Method:

For the sponge:
1) Grease and line two cake tins and preheat the oven to 180°C.
3) Sieve the cake's dry ingredients together and set aside.
2) Melt the chocolate and the butter together in a bowl over a double boiler and leave to cool slightly.
3) Whisk the eggs and vanilla together until frothy, add the sugar and whisk again until thick. The mixture should leave ribbons.
4) Fold the chocolate and butter mixture into the whisked eggs, then fold in the sieved dry ingredients until fully combined.
5) Pour the mixture evenly between your two tins and bake for 25 minutes until light and springy, or when a skewer comes out clean. Leave to cool in the tin.
6) When cool, take the cakes out onto a cooling rack and peel off the liner paper.

For the icing and filling:

1) Pop the icing sugar and butter into a bowl.
2) Melt the chocolate over a double boiler and then pour over the butter and icing and mix until combined.
3) Add in the cocoa powder and vanilla and again mix until fully combined.
4) Spread a thick, even layer over the top of one of the sponges and sandwich the other sponge on top.
5) Spread the rest of the icing over the cake and down the sides until fully covered and looking glorious!


We hope you enjoy this ridiculously delicious cake as much as we do and enjoy baking it in a slightly different style to normal!
Happy Baking!
xoxox

Genius Gluten Free Pains Au Chocolat Review

Genius Gluten Free Pains Au Chocolat Review

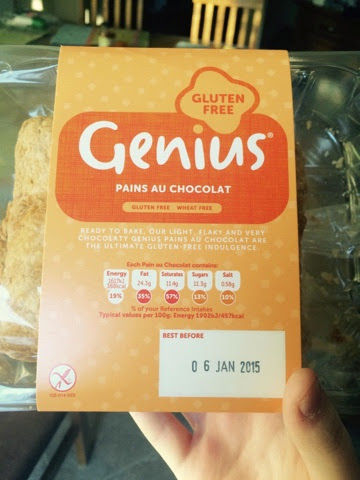
Since becoming dairy free, continental style breakfasts have gone out of the window. Traditional croissants contain huge amounts of butter so they are completely out of the window. So coming off a massive fail of trying to make croissants (the dough wouldn't stop rising for 2 days and we ended up with bread...) seeing these pains au chocolats peaked our interest. The pains au chocolats, as they are Genius are predominatly made for the gluten free market. This comes as no suprise to us as pretty much everything on the shelves that are dairy free are gluten free too (why would you only make one if you can cater to both markets?). The packaging doesn't claim to be dairy free (is produced in a factory that handles milk so cannot guarantee milk free) but as long as you do not have an allergy or an intense intolerance you should be fine. The taste test was from me (Heather) and our little brother Joe, who is also dairy intolerant.


Pains Au Chocolat Packaging

The pain au chocolats had the same size as normal pain au chocolats, and also had the same appearance. The pain au chocolats required 10 minutes in the oven at 190°C, to cook through and melt the chocolate in the middle.  


Before baking out of packaging

So after 10 minutes we took the pains au chocolats out of the oven. They had become darker in colour and more golden brown, like you would expect from a traditional pain au chocolat. The size was the same still and was piping hot throughout.

Out of the oven and cooked through
So here we get to the actual tasting. The pains au chocolats tasted nice but there was a few bits that both me and Joe were slightly disappointed with. The amount of chocolate inside was pretty dismal. As you can see from the photo below there was a thin layer of chocolate at the bottom of the pain, which considering there was alot of pastry inside the pain I for one found this dissapointing, yet Joe still loved this regardless as chocolate is chocolate! The other thing that disappointed me as a person who eats gluten was the texture. I completely understand that gluten free products will have a completely different texture, but this was quite claggy and sometimes hard to chew. For the product in hand and actually being able to eat a pain au chocolat again it was something I could and can live with, but I would just love some normal textured replacement food soon! This was a treat for me on New Years Day after a heavy New Years Eve and did help to quell the slushy stomach I had at the time. Joe enjoyed this product alot, he had never really eaten anything along the lines of croissant/ pain au chocolat before as these were unavailable when he was younger, and I think he enjoyed the aspect of something new to try that wasn't going to make him ill.


Pain au chocolate cut through the middle

For the sake of eating something that resembles normality, I did enjoy the pains au chocolats, as sometimes, as im sure quite a few of you will agree that you just want to feel a bit normal and not sat on the restricted diet train! These pains are not exactly healthy, but you can't really expect something with that much pastry, gluten free or not to be healthy! These pack a punch at 388kcals per pain, so would be a once in a while breakfast treat (I'm thinking Sunday morning in bed!). I feel like I struggle with the texture more than my brother as up until last year I was eating regular food and regular croissants! If you are gluten and dairy free however these are a good alternative to pains au chocolats and the only ones I have seen on the supermarket shelves. I would repurchase these again and would urge you to try the croissants in the brand (We have tried these and preferred them, liberal dairy free chocolate hazelnut spread applied!) As they are the best alternative you can get at the moment to normal all butter croissants that we know about! We bought these in Sainsburys and currently cost £2.49 which is pretty steep, but Genius products tend to be on the more expensive side in our experience. 


Pain au chocolat layer peeled apart

Overall I would rate this a 7/10, with more chocolate and a better gluten free texture would bump up the score further.

We hope this has been useful for you and opened your eyes to some other options available on the market for the dairy free crowd!

Happy Baking!

xoxox


Easy Chocolate Mousse

Easy Chocolate Mousse

After a slight break we are back with a delicious chocolate mousse for you!

Did you buy or receive a blender for Christmas, have become really bored with the juicing craze (khale smoothie anyone?) and now want something to do with your new sparkly blender? Well this luxurious mousse will tick all your boxes. This is an all in one dessert where all you need to do is blast the mix together and heat up the milk, what could be simpler?  This dessert is one which needs to be set in the fridge, preferably overnight so this makes the perfect night before prep dessert. There is a lovely hint of coconut behind it from the milk, but if this is not to your tastes soya milk will work perfectly too! Hope you enjoy!

You will need:

- 300ml chocolate coconut milk-
- 300g dark chocolate block or chips-
- 2 large eggs-
- 50g caster sugar-

Method:
1) Measure out your ingredients and put your chocolate, eggs and sugar in a blender. As we are blending the mixture, it will form a light, smooth texture, almost reminiscent of chocolate mousse. blend until the chocolate is in small chunks and the eggs and sugar have come together.


2) Put your coconut milk into a pan and heat over the stove until it starts to simmer or bubble, watching carefully that it doesn't boil over!


3) Take off the heat and pour the milk into the blender and blend for about 30 seconds, the hot milk will melt the chocolate and will help to bring the mix together.


4) Once everything is melted and combined, sieve the liquid to make sure there are no lumps left and pour into cups. Pop your cups or glasses into the fridge and leave overnight to set.


So here you have it, your delicious chocolate dairy free mousse just waiting for you to eat!

Happy Baking!

xoxox

Delicious Hot Chocolate

Delicious Hot Chocolate

So we are sat in the middle of January and it is ridiculously cold, windy and wet. As I write this post some of the country has come to a snowy standstill so what could be better than some delicious hot chocolate during this freezing cold period? The recipe only calls for 2 ingredients, dark chocolate and dairy free milk, we used soya as it gives the best thickness to the hot chocolate and most resembles cows milk. This recipe will be very rich and dark so feel free to sweeten if needed. Be careful when heating the milk that it doesn't boil over or burn, keep alert at all times!We added some whipped cream on top, ours came from soyatoo which you can order online for the price of normal whipped cream! We hope you enjoy this delicious and simple recipe, perfect for curling up with a book, in your pyjamas by the fire!

Ingredients:
-80g dark chocolate-
-400g Soya milk (or any other dairy free milk)-
-Optional whipped cream (we used Soyatoo)-

Method:
1) Add your chocolate and milk into a bowl or jug and melt over a double boiler or in the microwave (10-30 second blasts) until hot and thoroughly melted together.
2) Strain your hot chocolate through a tea sieve and serve!


Add any optional toppings, we used Soyatoo whipped cream from the can. You can also use marshmallows and some dairy free chocolate chips!


Happy Baking!

xoxox

How to temper dairy free chocolate

How to temper dairy free chocolate

My first attempts at trying to work with dairy free chocolate failed dramatically. The chocolate would not melt or would form unsightly creamy lumps at the top of the chocolates! Then it occurred to me that normal methods would have to be altered slightly to achieve gorgeous, glossy tempered chocolate!

The method I adapted was the classic seeding technique. This is one of the easiest methods to temper chocolate to create that beautiful, glossy finish to all your chocolates. You can temper chocolate both over a double boiler or in the microwave, using 10 second blasts and a candy themometer for achieving the correct temperature! You will also need to include the temperature of the room you are working in to your speed, as if a cold room you will have to work quicker as the chocolate will cool faster. This method will work for any volume of chocolate you need to temper. The change in the method is quite simple, but will allow for a good temper when using specialized chocolate, at the beginning when you first melt the chocolate, melt at the lowest heat and for a long time. This means the chocolate can slowly destabilise and when cooled will reform to give a smooth sheen and when broken in half will have a snap to it that non tempered chocolate won't have.

Method:

1) Using 2/3rds of your volume of chocolate, using a candy themometer melt this chocolate until the chocolate temperature is 45 Degrees Fahrenheit.

2) Into the melted chocolate, add in the last 1/3rd of the chocolate and let this melt into the chocolate until the chocolate has cooled to 28 Degrees Fahrenheit.

3) When the chocolate reaches 28 Degrees, reapply heat to the melted chocolate until the chocolate reaches 32 Degrees Fahrenheit.


After you have tempered your chocolate, you can use the chocolate in a variety of ways. We have a recipe for chocolate moulding here!

We hope you have found this useful for any chocolate moulding or decorating you're undertaking in the future!

Happy Baking!

xoxox


5 top recipes of 2014!

5 top recipes of 2014!

Hello everybody! We hope you have had the most glorious 2014 and are prepared to face a momentous 2015! Our blog is still a new-born baby in our eyes, (with that gorgeous new baby smell) only being created in late October, but I definitely have many favourite recipes from this time and have only just managed to whittle this down to 5 incredible recipes. When me and Caitlin decided to create our blog, we wanted to share all of our new found dairy free knowledge with the world, and help others to navigate the pretty scary transition from mainstream eating to cutting out such a big food group. For me, I was pretty terrified when I was told the news why I was constantly tired, throwing up, lethargic and having the trots on a daily basis was because I couldn't process dairy. I was pretty lucky (to an extent) because I have a brother and aunty that can't eat dairy either so I had a wealth of knowledge behind me, but that still doesn't prepare you for having no more dairy again. So for the end of 2014, the year my diet was turned upside down, we hope you have the greatest year and if you or anyone you know are making the transition from dairy to no more dairy, its really not a bad thing!
So onto the recipes!
 
This traybake is such a brilliant cake. Devised completely by Caitlin this cake is incredibly moist, has a beautiful coffee flavour with that classic hint of walnuts. This cake is so good, that our dad; a notorious savoury junkie even loves this cake (so it must be incredible!) At my previous job coffee and walnut cake was such a big seller that whoever you make this for is going to absolutely adore you for it!

Coffee and Walnut Traybake

Here in the Dairyfreesince93 household, cookies are such a big hit it's hard to explain! This recipe is so so simple to make and the cookies taste absolutely incredible. I made these cookies at Uni and they were a big success! The cherries give a really nice balance to the intense dairy free chocolate in the cookies! A recipe we will definitely be making again and again!

Chocolate Chip and Cherry Cookies

Profiteroles were such a brilliant success of our #12cakesofchristmas series (day 1 is here) and a resounding success for us too. Profiteroles lead us on the search for dairy free whipped cream, and we found this in the form of Soyatoo, which most definitely changed my Christmas! Surprisingly easy to produce and a great arm workout too, profiteroles will stand out on any table for any occasion all year round! They taste exactly like normal profiteroles too so will help yourself and others still feel like part of the gang!

Profiterole Pyramid

This brownie recipe has been in our family for a few years now, and each time we create these they get better and better! For this batch, Caitlin really outdid herself, they were so chocolaty and light (it's all in the whisking!) This was one of the first recipes we ever posted onto our blog and will forever remain one of our favourite go to recipes ever!

Ultimate Chocolate Brownies

Here we come to the last favourite recipe of the year, our incredible pizza! Every single item in this pizza is homemade and to me tastes like perfection. Bufala mozzarella has changed my pizza life (I can still eat normal pizza!) and the sauce in this is pure tomato indulgence. I made this recipe up on the spot and I am so proud of it. This is seriously a pizza to impress anyone!

Rustic Homemade Pizza
So there we have it! Our top 5 recipes from our relatively short year of blogging and we could not be prouder of them! We have so many more recipes planned for the year ahead that you will definitely have a dairy free dish for any occasion! If there are any requests for our blog for 2015 please comment or tweet us! So from both me and Caitlin we wish you the greatest 2015!

Lots of love and Happy Baking!
 
xoxox