12 Cakes of Christmas Day 5: Christmas Cake Pops


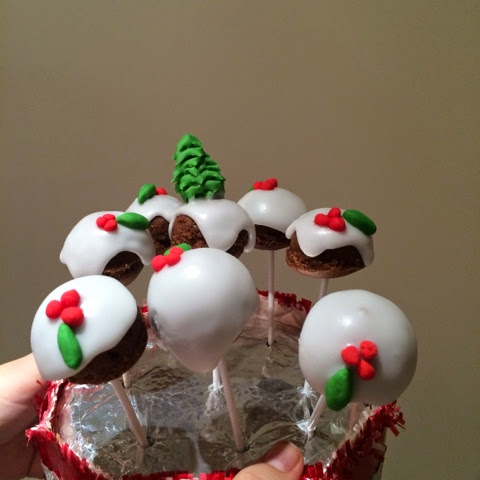
 Day 5 of our 12 cakes of Christmas is now here! Today we will be showing you our Christmas cake pops, lovingly decorated as Christmas puddings! So simple to decorate and the perfect treat sized pudding for when you're just too stuffed from your Christmas dinner! All you need is a cake pop mould and you're good to go!
Ingredients:
For the cakes:
-120g dairy free butter-
-150g caster sugar-
-1 teaspoon of vanilla extract-
-2 eggs-
-160g self raising flour-
-20g cocoa powder-
-4 tablespoons of milk (we used soya)-
Method:
1) Preheat the oven to 180°C and use cake release or simple greasing around the moulds of your cake pops.
2) Cream the butter and sugar until light and unable to feel the sugar under your spoon. Add in the vanilla and eggs and mix until combined.
3) Pop in half the flour, cocoa and milk and mix, and then add the rest.
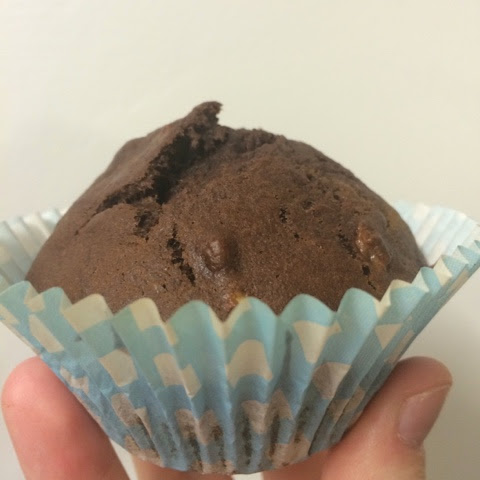
4) Put your cake pop mould onto a baking tray and use a teaspoon to fill each mould (not the one with the holes!) fill to the top and then add the cake pop lid!
5) Pop in the oven for about 15 minutes until the cake pops are cooked through (poke a cocktail stick in the top of the pop mould and see!)
6) Wait until completely cool to take the moulds out! Don't worry if some are slightly misshapen you can use these for other designs!
Once cooled, put your cake pops onto the cake pop sticks. Whip up some simple icing sugar and water until quite thick and pour over the top of your cake pop. Roll up 3 little red balls for the berries and then a leaf shape in green fondant for the leaf! place on top before the icing sets!


Happy Baking!
xoxox

12 Cakes of Christmas Day 4: Christmas Jumper Cake

Today is day 4 of our 12 cakes of Christmas! Today we're showing you our Christmas jumper cake. We originally made this for a Lakeland competition but we thought we would show you how we created this! This will look spectacular on the Christmas table as a brilliant dessert or centre piece, plus you can be creative and design this anyway you want. We used a jumper shaped mould to bake the cake in and used different coloured fondant icing to create the moulds. We covered the cake in white fondant and filled the sleeves in with green fondant. The trims were rolled out and cut to size for the neck and sleeves.


For the snowflakes:
We used a snowflake icing cutter set to create the different sizes. the cutter works best on about 1/2cm thick fondant!

For the leaves and berries:
We used red fondant for the berries rolled into small balls. For the leaves, we cut out a holly leaf shape using a knife, then used this as an outline for the rest of the leaves out of the green fondant.

For the Christmas trees:
We used green fondant and cut out the Christmas trees with a sharp knife, with the middle tree slightly bigger than the outer two trees.

For the candy canes:
We rolled out some white and red fondant into 2 even sausage shapes, then placed side by side and rolled together to create the candy cane pattern. We then bent the top over to create the cane shape.

For the Penguin:
This is very simple to create. We used a triangle of black fondant, an oval of white fondant and some orange coloured fondant. Press the white oval into the black penguin oval, making sure to leave room at the top to bend over the white oval. Pop two tiny black oval shapes into the oval for the penguins eyes and then roll some of the orange into a small triangle for the penguins nose. Bend the top of the triangle over the oval. Roll two orange balls and then squish and press onto the bottom of the penguin to act like feet! 

Happy Baking!

xoxox


12 Cakes of Christmas Day 3: Christmas Gingerbread


It's day 3 of our 12 cakes of Christmas and what can possibly be more Christmassy than Gingerbread? We've scrapped the traditional shape for snowmen and Christmas trees and are excited for you all to try our gingerbread! Be warned, the recipe can be extremely sticky if too much golden syrup is used so have an adequate amount of flour on hand to aide rolling and handling of the dough! These gingerbread are so soft they make the perfect Christmas themed snack!
Enjoy Everyone!


Ingredients:
-350g plain flour-
-1 teaspoon of bicarb of soda-
-3 heaped teaspoons of ground ginger-
-100g dairy free margarine-
-175g light muscavado sugar-
-1 beaten egg-
-3 tablespoons of golden syrup-

Method:
1) Preheat the oven to 180°C. Sieve the ginger, flour and bicarb into a bowl and rub in the margarine until it looks like breadcrumbs. Mix the sugar into the breadcrumbs, being careful to break big sugar lumps up.

2) Add the egg and golden syrup into the mix and stir until just forming, then get your hands back in and form the end dough (you might want to flour your hands first!).

3) When the outside has formed a smooth dough, roll out on a liberally floured surface (depending on dough stickiness) until about 1/2 to 1cm thick. Use your Christmas cutters to cut out shapes in the dough, and place on greased baking tray, reusing the spare dough constantly. Pop these in the oven for about 10 minutes until they just become golden on top and change colour.


Take the gingerbread out of the oven, don't worry if they have stuck together just use a sharp knife to separate them! Use a fish slice to slide them onto a cooling rack and leave to cool. Decorate with a simple sugar and water icing when cooled and voila! Share your gingerbread with friends and family and i cannot be beaten devoured with a nice cup of tea!


Happy Baking!
xoxox

12 Cakes of Christmas Day 2: Biscuit Baubles

Day 2 of our 12 cakes of Christmas is here! this is our version of the classic reception bake of biscuit baubles! The recipe used here is our Chocolate Biscuits recipe (follow the link!) which is super easy to create and make and is vegan friendly too! These biscuits can be hung on the tree for about a week before Christmas and make such an easy childrens bake so they can feel like they have added something they've made themselves to the tree!
Hope you all enjoy!


Make up the dough for the biscuits and roll out onto a lightly floured surface, use your christmas cookie cutters or any other cutters you have to cut out shapes in the dough. Using a cockail stick (for children) or a knife pierce a whole (quite wide) at the top of the shape so you can thread a ribbon through later on!


Pop in the oven for about 10 minutes or until cooked through and still a little soft! Pop on a cooling rack and leave to cool completely. Thread a ribbon through the top if destined for the tree and then decorate to your hearts content!


Happy Baking!

xoxox

12 Cakes of Christmas Day 1: Mince Pies

Welcome to our 12 cakes of Christmas! from today until Christmas Eve we will be bringing you some incredibly Christmassy cakes, chocolates, biscuits and more! Lets get you thoroughly into the Christmas spirit and give you some inspiration for you own Christmas' at home! We're kicking off the series with these insanely easy mince pies which are a great first Christmas bake!
Merry Christmas!

You will need:
- 210g dairy free butter-
- 325g plain flour-
- 90g caster sugar or granulated sugar-
- 1 tsp mincemeat per pie-

Method:
1) Preheat the oven to 180 and take out your equipment. Add the flour and sugar into a bowl and rub in the butter until it starts to form lumps.


 Knead the mix into a firm dough, don't worry if this takes a while, just keep going at it until the dough fully comes together.


2) Roll into a 5mm thick thickness and cut discs out of the dough, proceed to put these in a non stick fairy cake tray or a greased one depending on your personal preference. Fill the cases with the mincemeat and cut out some more discs to make lids, press the lids down at the sides and prick with holes to prevent any mincemeat from slipping out.


3) If you want a shiny top, coat with a light eggwash before baking, bake in the oven for 15-20minutes and set out to cool. Wait until completely cool to try and remove them from the tray as other wise they can be a bit crumbly and weak.
Perfect with some soya cream or custard flavoured with a dash of brandy or some brandy flavoured dairy free butter!
Happy Baking!
xoxox

Chocolate and Banana Muffins!

This is a recipe I found when perusing the internet, Nigella (the Goddess that she is) has created a recipe which looks incredible, tastes incredible and lets us let out our intense love for bananas and chocolate in a completely dairy free environment! We have adapted the oil levels because they were quite dry on first bake, and there is always the option of dark chocolate chips! This recipe made us 10 muffins!
Enjoy!
Ingredients:

-3 bananas-
-150ml veg or sunflower oil-
-2 eggs-
-100g light brown caster sugar-
-225g plain flour-
-1 sachet or teaspoon bicarbonate of soda-
-1 sachet or 3 tablespoons of cocoa powder-
-optional chocolate chips-
Method:
1) Preheat the oven to 200°C and line 10 cases into a muffin/ cupcake tin.
2) Mash your bananas in a bowl, then when mashed add your oil, eggs and sugar and mix until combined.
3) Combine your flour, bicarb and cocoa powder together and then sieve slowly (folding into the batter slowly in stages) into the batter until completely combined.
4) Spoon into your muffin cases and if adding chocolate chips drop on top at this stage.
5) Pop in the oven for 15 minutes until cooked through.
Cool on a cooling rack and when you can't wait no longer, tuck in!
Happy Baking!
xoxox

Coffee and Walnut Tray Bake

The coffee and walnut cake is an obvious hit, at my previous workplace it was one of the best selling cakes on display, and is one of the only cakes our dad (who has a super savoury tooth) will dare to eat! If you're a coffee-holic or just love walnuts this is definitely the cake for you! As this is whipped up into a tray bake it is perfect for slicing and taking to parties, picnics or for grown up party bags! We hope you enjoy this delicious recipe and have some inspiration for your own bake!
You will need:

For the cake:
- 150g dairy free butter-
- 150g muscavardo sugar-
- 3 eggs-
- 150g self-raising flour-
- 3 tbsp strong coffee-
- 50g walnuts, chopped-

For the icing:


-300g icing sugar-
-100g dairy free butter-
-3 teaspoons strong black coffee-
-(could be more depending on your required thickness)-

Lets go!
1) Preheat the oven to 180 and grease and line a tray bake tin.

2) Beat the butter and sugar together until smooth and add the eggs.

3) Sieve the flour in and mix until fully combined. Then, pour in the coffee, if you want a more potent taste, you can always add in more coffee, or less if preferred.

4) Carefully chop the walnuts into a quarter their usual size and fold in.

5) Pour the mix into your tray bake tin and smooth over, ensuring the mix has reached the edges and corners.


6) Bake for 20-25 minutes until the mix is coming away from the tin at the sides and when poked with a knife no wet mix comes out.

7) Whilst the cake is in the oven it is the perfect time to whip up the icing. Mix the butter and icing sugar together, and slowly add the coffee until the icing reaches the taste and consistency you require!


8) Slather the freshly made icing all over your cooled completely cake, sprinkle some walnuts on top if you would prefer, cut yourself a slice and enjoy!


Happy baking
xoxox