Hotel Chocolat Milk- Free Milk Chocolate

*disclamer, this chocolate has had a product recall due to the risk of milk, you can return the chocolate to hotel chocolate if needed if you are allergic or not happy with the chocolate!

Easter is fast approaching (this weekend!) and I am eager to suss out more dairy free chocolate options to try and stop me dicing with destiny and just indulging in a Crème Egg Easter egg! I had heard from other dairy free blogs that Hotel Chocolat had launched a range of milk- free milk chocolate, I was more than intrigued. I was at home last weekend, and as there is a Hotel Chocolat there I just thought, why not? I picked up 2 edible 'bunny licks' (very cute and Easter themed) one for me and one for our brother Joey. I also picked up a packet of 'puddles', which are basically just giant buttons!
I was slightly taken aback by the price, I knew the chocolate would be costly (coming from a specialist shop) but I suppose you are paying for the chocolate specialism and the awkwardness of making it dairy free! Each bunny cost £1.95 each, and the packet of puddles cost £5.50. Being the sucker I am for something that might revolutionise my chocolate life I forked out.
The chocolates are made with almond powder instead of milk powder, which I think is a different approach to chocolate than I have seen before, yet excludes nut allergy sufferers from the range. However, the range is completely vegan and vegetarian, which is something to consider! The chocolate also uses sunflower lecithin instead of soya lecithin which may benefit some with allergies.

Chocolate Bunny:

bunny lick

Ingredients:
Cocoa solids (cocoa mass, cocoa butter), sugar, almond powder, emulsifier (sunflower lecithin). 

Chocolate puddles:

Chocolate Puddles

Ingredients:
Cocoa solids (cocoa mass, cocoa butter), sugar, almond powder, emulsifier (sunflower lecithin).
Chocolate Puddles

My thoughts:

As it is before Easter and Joey is getting his on Sunday I can't give you his thoughts, even though knowing him chocolate is chocolate and he won't notice anything different!
The first thing that hit me about these chocolates was that they definitely had a creamy feel in the mouth and tasted immediately like normal chocolate, if not a weaker version. After this had subsided there was a definite fruity undertone to the chocolate, which I would liken to raisins. I liked the fact that they looked completely like normal chocolates as well, unlike some I've had before. Aftera few puddles they definitely start to become a little sickly, which is something I never normally have issues ploughing through! Overall I quite liked these choccies. For me, this is one of the closest chocolates to normal chocolate I have found. I wouldn't mind eating this occasionally as an extravagant (probably payday) treat! The price point does put me off, as I am a student, but I would buy this as a gift for others.
Available within the range was 2 different types of Easter eggs and some mini chocolate bunnies in a pack.
I hope you have found this useful and if you feel a little treat is needed then this is a great range of chocolate!
Happy Baking!
xoxox

Spicy Chicken and Chorizo Stew

It's felt like years since we last blogged, even though it has only been little over a week! Life gets in the way sometimes, and quite a lot of the time it's pretty difficult to plan things to cook for the blog as I'm in Sheffield at Uni and Caitlin's at home. I feel like we are getting into the rhythm of blogging, not sounding too blunt and being a bit softer. Neither of us are that impressive with English (unlike our English obsessed sister) so it's still definitely a getting there process for us. I never want blogging for me or Caitlin to feel pressurised or not fun anymore. It's a hobby we can do together and I love that, considering we're apart for weeks at a time. So I'll stop boring you all with our lives and it's onto the recipe!
 
Whilst I was sat at work, I couldn't stop thinking about beans and chorizo. Considering one of my passionate food hells is baked beans I thought this was a bit coco bananas! But it got to the point where it was nigh on obsessive, and as I was due to go food shopping anyway I thought why the heck not buy some stuff and mash it together and see what happens! So what was created was the chicken and chorizo stew. I'm not really sure why it is called a stew, but to be honest I couldn't think of a more suitable name for this! It's based on tomato and has a heck lot of garlic and chilli in for flavour and a nice warm kick up the bum! I used a small tin of cannelloni beans for this, alongside some chorizo sausage and turkey (I used turkey as it was cheaper in the shops but can be made with either chicken or turkey!). It really filled me up and I missed the feeling of being full up but in a healthier way, and not just from KFC (which may or may not have been happening far too often recently). The tomato makes for a delicious base to the dish and everything else compliments beautiful, and would even taste delicious with added bacon or no chilli if you wished! Quite a lot of the amounts here are rough estimates, just splash however much you want in of everything to your own tastes! We hope you all enjoy!

Spicy Chicken and Chorizo Stew

Ingredients:
-splash of oil for the pan-
-500g chicken or turkey, diced-
-2 small chorizo sausages-
-50g onion-
-1 small tin of cannelloni beans-
-1 large tin of tomatoes-
-1 small tin of sweetcorn-
-30g tomato puree-
-30g crushed chilli-
-30g garlic puree-

Method to the madness:

1) Pop oil into pan, and add the diced meat, chorizo sausage and onions. Cook for 3-4 minutes until the meat is cooked through.

2) Add in the beans, sweetcorn and tomato, stir through.


3) Add in your garlic, tomato puree and chilli, stir again and simmer down for around 10 minutes.
 
Look at that beautiful uni hall stove, so pretty...

4) When reduced down, meat cooked and the flavour is what you require, take off the heat, pop in your bowl and tuck in!
 

So in under 20 minutes you should be left with a super simple, quick and hearty meal, enough to feed 2-3 people depending on sides! As you can see I enjoyed mine with a cider and I regret nothing!
 

We hope you enjoy!
 
Happy Baking!
 
xoxox

Minute Molten Mug Brownie

Hi everyone! As you may have seen we have had a slight blog redesign, with a new banner which should make us easier to find on twitter and instagram! Please let us know what you think of these, we're slowly learning all about blog coding and layouts so please bear with us whilst we figure out how to make the blog look and feel the best it can be! However, now is the thing you've been waiting for- the recipe!
Coming of the back of our delicious minute mug cookie recipe, we are bringing you all yet another super delicious, minute long recipe for the impatient chocoholics out there! The recipe can be made in any microwavable mug, perfect for curling up on the sofa and eating whilst watching some Sunday night TV! Once again this recipe is only measured out in tablespoons, so can be measured at home or in the office (if you're feeling particularly naughty!). This recipe is incredibly moist and gooey, and if you prefer a harder brownie you can keep it in the microwave for slightly longer! The chocolate chips in this recipe can be swapped for a dairy free Nutella style spread, we normally use Natures Store chocolate hazelnut spread which we find tastes exactly the same as normal Nutella! We hope you enjoy!


You will need:

- 2 tbsp water-
- 2 tbsp dairy free butter/ margarine-
- 4 tbsp caster sugar-
- 2 tbsp cocoa-
- 4 tbsp plain flour-
- 1 tbsp dairy free chocolate chips (or dairy free nutella like spread if you fancy it!)


1) Melt the butter in the microwave at short 20 second bursts until fully melted.


2) Mix all the ingredients into the butter well so that the mixture is smooth and has no lumps.


3) Pop your brownie mixture into the microwave for 40-70 seconds depending on how squidgy you like your brownie!

4) Leave to cool for 1-2 minutes until just warm and serve!

We hope you enjoy another super quick and simple mug cake recipe as much as we enjoyed eating it!

Happy Baking!

xoxox

44 Home Truths Dairy Intolerant People Know!

The big thing on both our facebook feeds at the moment is the trend for these little lists, so we thought we'd do one about the eternal life struggle of living your life without dairy. Coming off dairy when you have no other choice is one of them things- if you don't laugh about it then you'll just cry. So here we have 44 of the struggles of not eating dairy...


  1. Never being able to eat a Dominos again. Unless you eat pizza without cheese, then you're just fucking weird.
  2. Being an awkward person and having about 2 restaurants you can eat at safe in the knowledge of low risk of diarrhea.
  3. Being unable to leave the house without a full pack of diarrhea tablets.
  4. Seeing a free from pizza in the supermarket, internally crying with excitement until you realise its only gluten free.
  5. Everything you want to eat is only gluten free.
  6. All free from foods creating a crater sized dent in your purse.
  7. Seeing pizzas with goats cheese or buffalo mozzarella and then realising they are covered with normal cow mozzarella too.
  8. Never buying a shop bought pizza again.
  9. Thinking a product is safe until you see the dreaded 'whey powder' on the back.
  10. Never being able to make protein gains again without rupturing your anus.
  11. Risking 'may contain milk' cos you just can't cope any longer.
  12. People taking you out for food and then watching them be terrified they've accidentally poisoned you.
  13. Screaming FUCK MY LIFE when Cadbury Creme Eggs come out to play and you can't play :(.
  14. Wondering why you have been given this no dairy gift and are still not losing any weight.
  15. The spots you hoped would leave your face are still there. So it wasn't dairy then was it, just your goddamn hormones :(.
  16. Your farts becoming so toxic at the mere hint of dairy they could be used during chemical warfare.
  17. Threatening everyone with said farts.
  18. Worrying far too much about where you're gonna get your calcium, I don't want no bones dammit.
  19. Being ribbed the shit out of for your malfunctioning bumhole.
  20. Being unable to spell 'diarrhea' even though you get it minimum once a week.
  21. Judging whether or not to throw up or shit yourself first, or just risk it and do both at the same time.
  22. Giving in to one 'low risk' dark chocolate and regretting your decision for the next week.
  23. Having to ask for no cheese at Subway and only being able to have it toasted :'(.
  24. Alternative milks. Drinking milky water or the taste of a farm no thank you.
  25. Never being able to try Baileys.
  26. Never being able to try a choco milko (the tears are real).
  27. Bleaching your toilet more frequently than other normal humans.
  28. Not feeling like a normal human at all.
  29. Trying to convince other people they're dairy intolerant so you don't feel so alone.
  30. Having intense dairy envy when watching anyone look at/taste/smell dairy.
  31. Calling in sick because you're lying on the bathroom floor crying about your life cos someones snuck some dairy in without your knowledge.
  32. Taking calculated risks every time you eat.
  33. Realising you're only one step away from being a vegan (bacon stay with me!).
  34. Having the choice of 1 sandwich on the go.
  35. Watching out for crisps hiding milk in there (yes Pringles I'm talking to you you fuckers).
  36. Having to get your friends to strip cheese off their cheesy chips on a night out so you can eat them, yet still get ill the next morning.
  37. You KNOW the difference between hangover poos and dairy poos.
  38. Only being able to get ice cream from Waitrose.
  39. Having to visit health food/ vegan shops way more than you would ever have intended before.
  40. Never eating dessert again.
  41. Having to watch WINE of all things trying to kill you cos its strained through a cow (Why? How? The need?).
  42. People not understanding the difference between lactose and dairy intolerant.
  43. Feeling like your heart has been ripped out cos you miss cheese, milk and butter so, so badly :'(
  44. Realising you're gonna have to live like this for the rest of your life.
The struggle is real folks.

xoxox


Momma's Special Chocolate Birthday Cake

Here we are again with a brand new recipe! We can't believe we are almost at the end of February already; where is the time going? However, the end of February means that it is time for our mom's birthday! To celebrate this Caitlin has made the most awesome dairy free cake we have ever tasted, a delicious chocolate fudge cake!


Birthday chocolate fudge cake

The sponge here is incredibly moist, and is enclosed in a deliciously thick and super rich icing which is so fudgy the smallest slice is needed for maximum impact! There are no pictorial instructions for this cake as we were too excited to get this in the oven and bake it before we remembered, so the post is just littered with scrumptious photos of the finished cake instead! This one is for you momma, happy birthday xxx

Ingredients:

For the cake:
-200g dark chocolate-
-200g dairy free butter-
-4 eggs-
-1 tsp  vanilla extract- 
-325g caster sugar-
-175g self raising flour-
-1 tsp baking powder-
45g cocoa powder-

For the icing and filling:

-300g icing sugar-
-150g dark chocolate-
-150g dairy free butter-
-15g cocoa powder-
-1 tsp vanilla extract-

Method:

For the sponge:
1) Grease and line two cake tins and preheat the oven to 180°C.
3) Sieve the cake's dry ingredients together and set aside.
2) Melt the chocolate and the butter together in a bowl over a double boiler and leave to cool slightly.
3) Whisk the eggs and vanilla together until frothy, add the sugar and whisk again until thick. The mixture should leave ribbons.
4) Fold the chocolate and butter mixture into the whisked eggs, then fold in the sieved dry ingredients until fully combined.
5) Pour the mixture evenly between your two tins and bake for 25 minutes until light and springy, or when a skewer comes out clean. Leave to cool in the tin.
6) When cool, take the cakes out onto a cooling rack and peel off the liner paper.

For the icing and filling:

1) Pop the icing sugar and butter into a bowl.
2) Melt the chocolate over a double boiler and then pour over the butter and icing and mix until combined.
3) Add in the cocoa powder and vanilla and again mix until fully combined.
4) Spread a thick, even layer over the top of one of the sponges and sandwich the other sponge on top.
5) Spread the rest of the icing over the cake and down the sides until fully covered and looking glorious!


We hope you enjoy this ridiculously delicious cake as much as we do and enjoy baking it in a slightly different style to normal!
Happy Baking!
xoxox

Genius Gluten Free Pains Au Chocolat Review

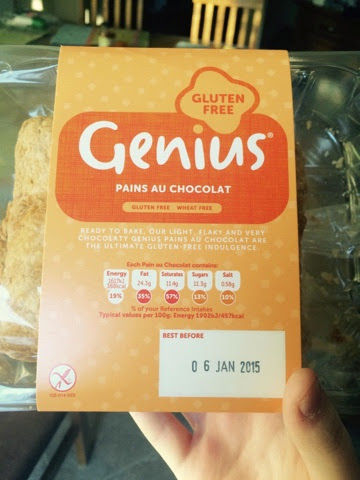
Since becoming dairy free, continental style breakfasts have gone out of the window. Traditional croissants contain huge amounts of butter so they are completely out of the window. So coming off a massive fail of trying to make croissants (the dough wouldn't stop rising for 2 days and we ended up with bread...) seeing these pains au chocolats peaked our interest. The pains au chocolats, as they are Genius are predominatly made for the gluten free market. This comes as no suprise to us as pretty much everything on the shelves that are dairy free are gluten free too (why would you only make one if you can cater to both markets?). The packaging doesn't claim to be dairy free (is produced in a factory that handles milk so cannot guarantee milk free) but as long as you do not have an allergy or an intense intolerance you should be fine. The taste test was from me (Heather) and our little brother Joe, who is also dairy intolerant.


Pains Au Chocolat Packaging

The pain au chocolats had the same size as normal pain au chocolats, and also had the same appearance. The pain au chocolats required 10 minutes in the oven at 190°C, to cook through and melt the chocolate in the middle.  


Before baking out of packaging

So after 10 minutes we took the pains au chocolats out of the oven. They had become darker in colour and more golden brown, like you would expect from a traditional pain au chocolat. The size was the same still and was piping hot throughout.

Out of the oven and cooked through
So here we get to the actual tasting. The pains au chocolats tasted nice but there was a few bits that both me and Joe were slightly disappointed with. The amount of chocolate inside was pretty dismal. As you can see from the photo below there was a thin layer of chocolate at the bottom of the pain, which considering there was alot of pastry inside the pain I for one found this dissapointing, yet Joe still loved this regardless as chocolate is chocolate! The other thing that disappointed me as a person who eats gluten was the texture. I completely understand that gluten free products will have a completely different texture, but this was quite claggy and sometimes hard to chew. For the product in hand and actually being able to eat a pain au chocolat again it was something I could and can live with, but I would just love some normal textured replacement food soon! This was a treat for me on New Years Day after a heavy New Years Eve and did help to quell the slushy stomach I had at the time. Joe enjoyed this product alot, he had never really eaten anything along the lines of croissant/ pain au chocolat before as these were unavailable when he was younger, and I think he enjoyed the aspect of something new to try that wasn't going to make him ill.


Pain au chocolate cut through the middle

For the sake of eating something that resembles normality, I did enjoy the pains au chocolats, as sometimes, as im sure quite a few of you will agree that you just want to feel a bit normal and not sat on the restricted diet train! These pains are not exactly healthy, but you can't really expect something with that much pastry, gluten free or not to be healthy! These pack a punch at 388kcals per pain, so would be a once in a while breakfast treat (I'm thinking Sunday morning in bed!). I feel like I struggle with the texture more than my brother as up until last year I was eating regular food and regular croissants! If you are gluten and dairy free however these are a good alternative to pains au chocolats and the only ones I have seen on the supermarket shelves. I would repurchase these again and would urge you to try the croissants in the brand (We have tried these and preferred them, liberal dairy free chocolate hazelnut spread applied!) As they are the best alternative you can get at the moment to normal all butter croissants that we know about! We bought these in Sainsburys and currently cost £2.49 which is pretty steep, but Genius products tend to be on the more expensive side in our experience. 


Pain au chocolat layer peeled apart

Overall I would rate this a 7/10, with more chocolate and a better gluten free texture would bump up the score further.

We hope this has been useful for you and opened your eyes to some other options available on the market for the dairy free crowd!

Happy Baking!

xoxox


Easy Chocolate Mousse

After a slight break we are back with a delicious chocolate mousse for you!

Did you buy or receive a blender for Christmas, have become really bored with the juicing craze (khale smoothie anyone?) and now want something to do with your new sparkly blender? Well this luxurious mousse will tick all your boxes. This is an all in one dessert where all you need to do is blast the mix together and heat up the milk, what could be simpler?  This dessert is one which needs to be set in the fridge, preferably overnight so this makes the perfect night before prep dessert. There is a lovely hint of coconut behind it from the milk, but if this is not to your tastes soya milk will work perfectly too! Hope you enjoy!

You will need:

- 300ml chocolate coconut milk-
- 300g dark chocolate block or chips-
- 2 large eggs-
- 50g caster sugar-

Method:
1) Measure out your ingredients and put your chocolate, eggs and sugar in a blender. As we are blending the mixture, it will form a light, smooth texture, almost reminiscent of chocolate mousse. blend until the chocolate is in small chunks and the eggs and sugar have come together.


2) Put your coconut milk into a pan and heat over the stove until it starts to simmer or bubble, watching carefully that it doesn't boil over!


3) Take off the heat and pour the milk into the blender and blend for about 30 seconds, the hot milk will melt the chocolate and will help to bring the mix together.


4) Once everything is melted and combined, sieve the liquid to make sure there are no lumps left and pour into cups. Pop your cups or glasses into the fridge and leave overnight to set.


So here you have it, your delicious chocolate dairy free mousse just waiting for you to eat!

Happy Baking!

xoxox